
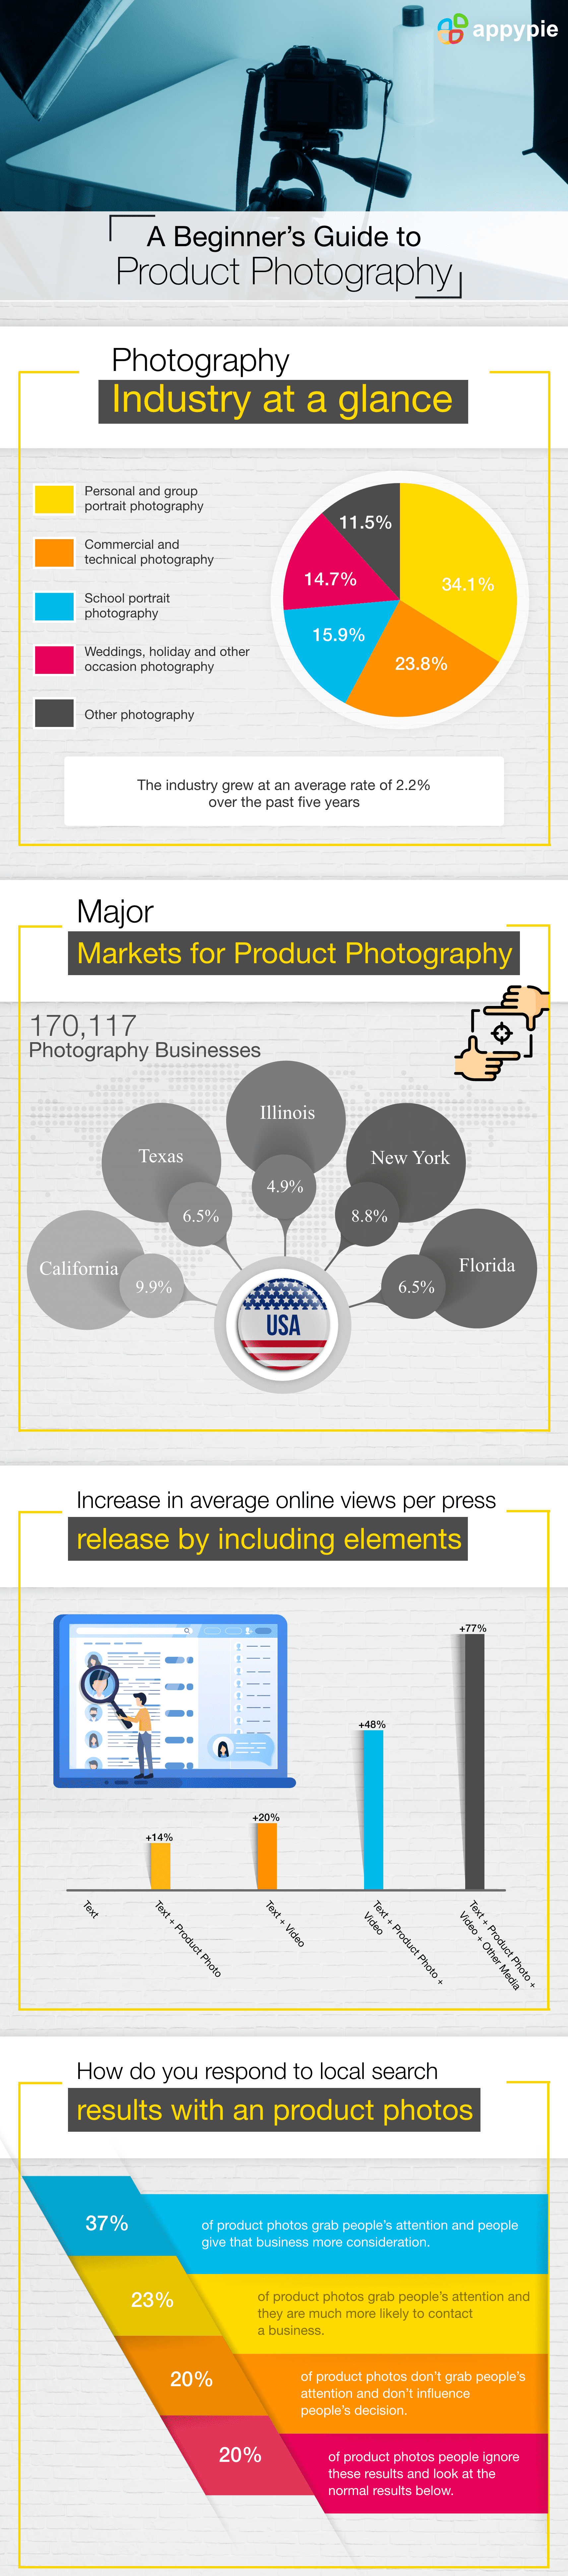
A Beginner’s Guide to Product Photography

By Abhinav Girdhar | Last Updated on March 25th, 2023 8:22 am | 4-min read
Table of Content
Looks sell. No matter how much you talk about what’s inside, looks will sell. Therefore, how your product appears to people, is one of its most important selling points. The better it looks in the brochures, the more people will be interested in it. In fact, according to research, 93% of people are interested in a product only if it is good to look at. Let that sink in. Product photography is not as simple as most people assume. I would recommend hiring a professional to take photographs of your product but for a small business or individual, affording one is not always an option, you can use photo editing software also.
 Even if you can afford a professional, there are deeper problems with hiring a professional photographer. Product photos need to be updated regularly and no small business can continue hiring professionals each time. Therefore, you must know how to take proper product photographs.
Keeping that in mind, it is time to start taking product photographs worthy of taking your brand to the next level.
Even if you can afford a professional, there are deeper problems with hiring a professional photographer. Product photos need to be updated regularly and no small business can continue hiring professionals each time. Therefore, you must know how to take proper product photographs.
Keeping that in mind, it is time to start taking product photographs worthy of taking your brand to the next level.Getting the Basics Right
There are a few basic photography tricks that you can implement to ensure that your product photograph comes out well.- The Grid and Rule of Thirds
- Lighting
- Equipment
- A table set against a wall
- A smartphone tripod
- An adjustable floor lamp
- LEDs, CFLs, and Bulbs (depending on requirement)
If you are a beginner photographer, you need to know what a grid is. Assuming you’ll be taking a photograph with your phone, the grid is a set of lines that can help you take better photos. Take the photo keeping the infamous ‘rule of three’ in mind. According to the rule, the focus of your image should occupy a third of the image to make it look better. An example has been given below. If you notice closely, you’ll realize no matter how large the object is, it will always seem to occupy limited space in a photo. Use the grid lines of your camera to get this aspect right. Apply this rule correctly, and you’ll improve every photograph you take. One thing to remember is that the rule of thirds is one of many ways to take a photograph and taking a photograph without applying it can also be good depending on the other basics.
Proper lighting is the deal-breaker for a good photograph. Without good lighting, a photo is incomplete. The position of light can affect your photograph drastically. There are two types of lighting your photo can have hard and soft lighting.
For a beginner, hard lighting can be a challenge since even some professionals vary from using hard lighting in their photos. Stick to soft lighting for now. Position your light in such a way that it illuminates your product well and makes it look good. The photo below will show you the difference between good and bad lighting.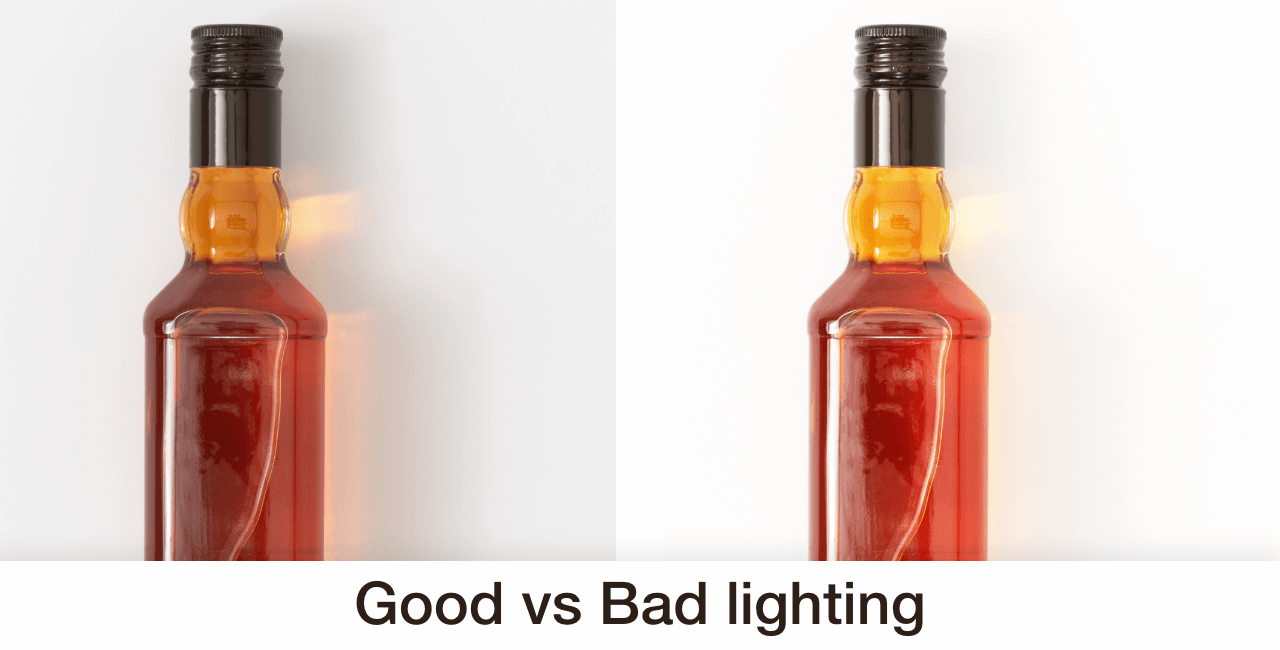 There are various blogs online that can guide you on how to improve your lighting.
While other blogs talk about all the expensive equipment you will need, I’ll spare you that expense. You’re a rag-tag survivor and I will recommend you my very own rag-survivor-photography kit that I use when I find the intense need to photograph something.
It includes the following:Types of Product Photographs
There are many kinds of product photographs you can create. However, all of them can be categorized into three broad categories:- Portraits
- Applicative (In-use photographs)
- Unrelated Candids
Portraits are simple product photographs. Portraits do not necessarily need to follow the rule of thirds since their purpose is to highlight your product. The focus in a portrait is on your product and is especially suited for products that are meant to be aesthetically pleasing. For example, a photo of a new shoe design.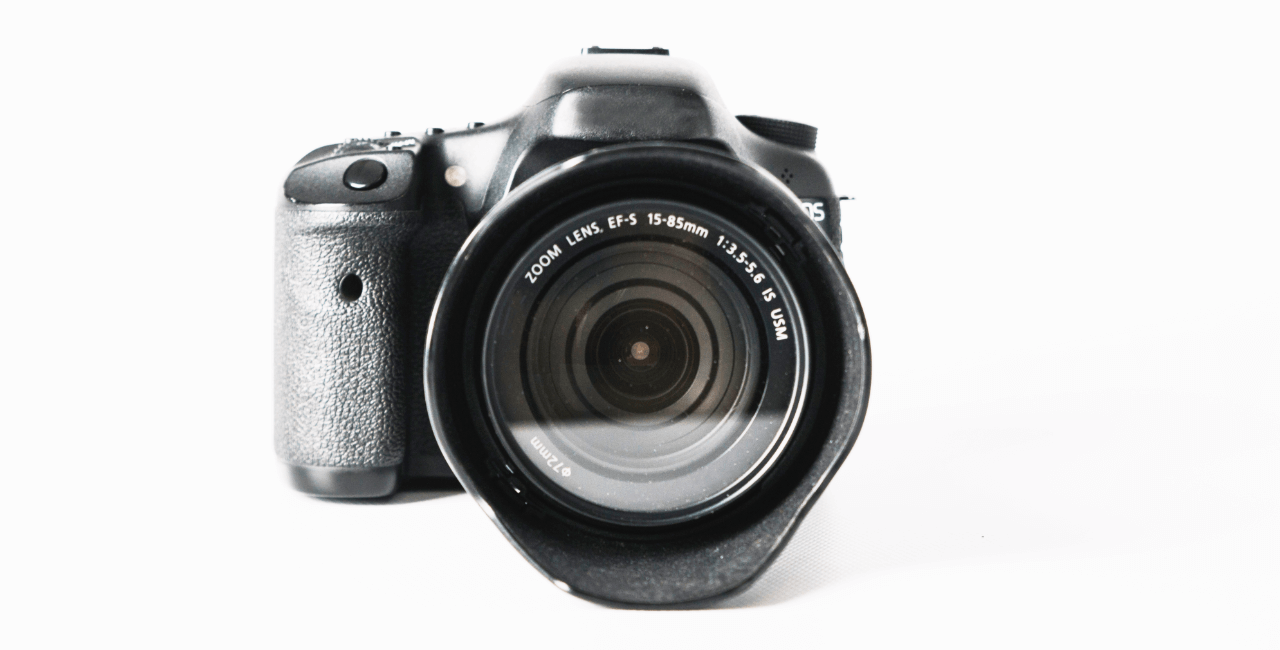 Portraits can be further divided into various categories. The image given above is a portrait of a camera with a white background. Portraits require near-perfect lighting to look good.
Applicative photographs are my favorite kind of photographs. The purpose of an applicative photograph is to show your product being used. The photo given below shows a camera in use.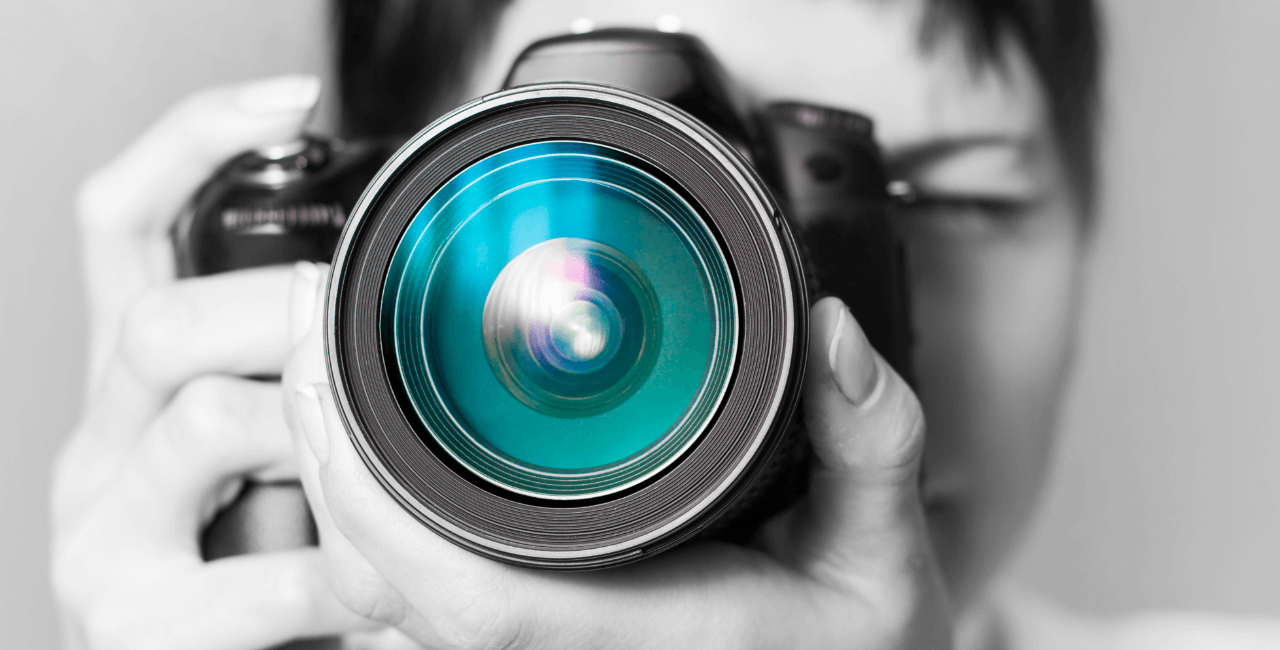 Applicative photographs are extremely good. Showing your product in-use is one of the best ways to attract attention to it. They act as verifiable value propositions for your product. Applicative photographs should always be a part of your product brochure. Not showing a product being used might take away potential customers.
These product photographs are meant for creativity. They can either be used in advertising, or memes. The purpose of candid product photographs is to raise curiosity for what it is. Many big brands create such photos just to make people curious about a product. Candids can also be used to tease an upcoming product.Tricks to Make Photos Better
Now that we’ve discussed the basics and the types of photographs, here are tips that beginners can use to get the best photos possible.- Natural v/s Artificial Light
- Bouncing Light
- Shoot Multiple Photos
- Keep Focus on Your Product
- Using Real-World Backgrounds
- Choose a lighting style
- Minimal editing
Lighting is crucial. If possible, position your product in such a way that natural light falls on it. Artificial light helps but natural light provides the best soft lighting. Try and place your product opposite a source of light in such a way, that the light is behind the camera but not obstructed by it. This can help you get exquisite photos.
If natural light is lacking, or your photoshoot is being taken on a rainy day, you can use artificial lighting. Artificial lighting is most suited for product photos. If artificial lighting is too ‘hard’ and creates a bad photo, you can ‘bounce’ light to make photos better
‘Bouncing’ light is only necessary when there is a lack of natural light and the artificial lighting is too hard. To bounce light, you need a reflective surface. A mirror or a A4 sheet of paper can act as a makeshift light bouncing device. However, you can purchase a bounce card. They tend to be cheap.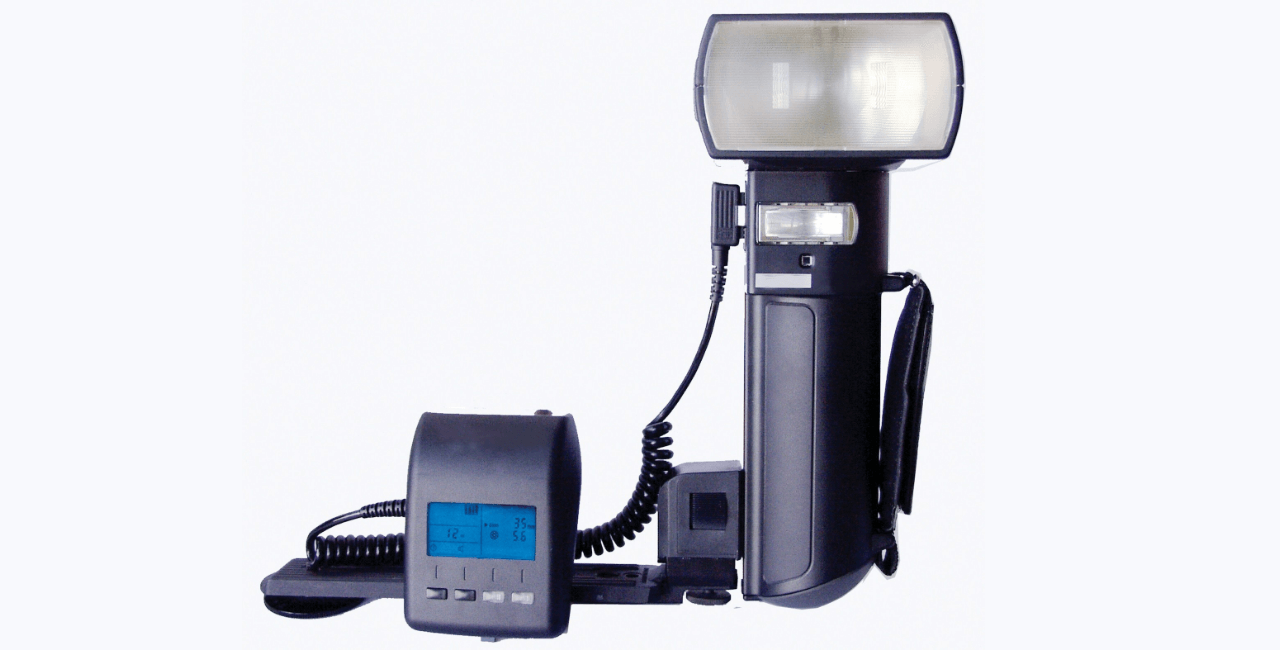 To get a proper portrait, you can have a source of light hit the bounce card and then hit your product. This can help illuminate products better. It can also be used to make sure that both sides of a product get proper light exposure and create a better picture.
Always click multiple photos to ensure that you have choices to choose from.
This is applicable when taking in-use photographs. Make sure that the focus of the camera is on the product and not on what/who is using it. If you can follow the rule of thirds here, then you’re in for an even better photograph.
When using the real-world as a background, taking the photo in a way that blurs the background, ensures that your product is in focus. It is always a good idea.
Never use both artificial or natural light. Always choose a singular lighting style.
Try not to photoshop your product photo too much. The more natural you keep it, the better.Conclusion
That’s all there is to it. One final tip I can give is to imagine that you’re taking a selfie. You won’t want to take a bad selfie, would you? Remember that while taking a product photograph. Before I bid adieu, there’s one last thing. I have a question for you. What do you do once you’ve taken your photograph? How do you market it? To answer all your burning questions, I recommend checking out Appy Pie Academy. We’ve got tons of marketing courses for you there.Related Articles
- What Are Webhooks? [Understanding Webhooks]
- How Plumber Chatbots are Transforming Customer Service in the Plumbing Industry
- Raksha Bandhan: Celebrating the Divine and Pure Bond of Love Between Brothers and Sisters
- Magic Insert: Style-Aware Drag-and-Drop
- Database vs Spreadsheet- Choosing the Best Data Management Tool
- 15 Great PayPal Alternatives for Enhanced Payment Services
- Q4 Ecommerce Strategy: Tips to Get Your Business Ready for Q4
- Initial Coin Offerings – The Next Frontier of Startup Funding
- What are NFT Games and How do they Work?
- How to Use TikTok: A Comprehensive Step-by-Step Guide