

Introduction
Let’s admit it. A perfect picture shot with a disrupted background, we all have been through it. The dilemma of wishing the photo could be retaken or the background was better is something we all experience every day. In this age of smartphones and social media, everyone wants their photos to look their best. But sometimes, a cluttered or distracting background can ruin an otherwise perfect shot. Luckily, AI-powered blur background tools are here to save the day! One fascinating aspect is the ability to effortlessly blur backgrounds using AI technology, taking your pictures to the next level. In this blog post, we'll show you how to use simple AI tricks to make your images look amazing by giving them that professional blurred background effect to transform them into visually stunning masterpieces with captivating, blurred backgrounds.
Table of Content
- Introduction
- Steps to Create A Blur Background with AI
- Tools of the Trade: AI-Powered Background Blurring
- How to Blur Background In Appy Pie Design?
- How To Blur the Background Using Magic Studio: Background Blur?
- How to Blur Background in Photoshop?
- How To Blur Background Using PhotoRoom Blur Background Tool?
- Blurring Backgrounds with Inpainting and Outpainting Techniques
- Why Blur the Background?
- Conclusion
Steps to Create A Blur Background with AI
There are few general steps to blur background using AI tools which are listed below:
- Upload Your Image: Start by uploading the image you want to edit. This is typically done by clicking on an "Upload" or "Choose File" button in the AI tool's interface. You'll select the image from your device's storage.
- Let the AI Work: After uploading, let the AI work its magic. Many AI tools use advanced algorithms to automatically identify the main subject and distinguish it from the background. The tool will then apply a blur effect to the background, creating a separation between the two.
- Fine-Tune the Blur: Most AI tools offer options for fine-tuning the blur effect. Explore settings that allow you to adjust the intensity of the blur—how much or how little you want the background blurred. Additionally, you may find tools like background remover, providing a more realistic and aesthetically pleasing result.
- Adjust Intensity: Look for a slider or numerical input that controls the intensity of the blur. Slide it to the right for a stronger blur or to the left for a more subtle effect. This step allows you to customize the level of blur background according to your preferences.
- Refine Edges: Some AI tools offer settings to refine the edges of the subject, ensuring a clean and natural transition between the focused subject and the blurred background. Adjust these settings to achieve a seamless and professional-looking result.
- Preview the Result: Before finalizing your edit, use a preview feature if available. This allows you to see how the changes you've made affect the overall image. It's a crucial step to ensure you're satisfied with the result.
- Download and Share: Once you're happy with the edited image, look for options to download or save it. Many AI tools also offer easy sharing options, allowing you to showcase your masterpiece on social media or other platforms.
By following these steps, you can leverage the power of AI to blur the background of your images, achieving professional-looking results with ease. Now let’s delve deeper into the specific AI tools that can be used to blur the background of your photos.
Tools of the Trade: AI-Powered Background Blurring
Now, let's explore some of the best AI-powered tools available for blurring backgrounds:1. Appy Pie's Blur Image Tool
Appy Pie's Blur Image Tool is like a super easy button for making your photos look extra cool. It's for everyone, not just tech experts! With this simple app, you can blur the background of your pictures in no time, making your main subject stand out. No need to worry about complicated stuff—just upload your photo, play with a few settings, and bam! Your picture looks awesome. Whether you're taking pics of your friends or showing off something you're selling, Appy Pie makes it easy. Get ready for super simple photo editing that makes your pictures look way better in just a few clicks.
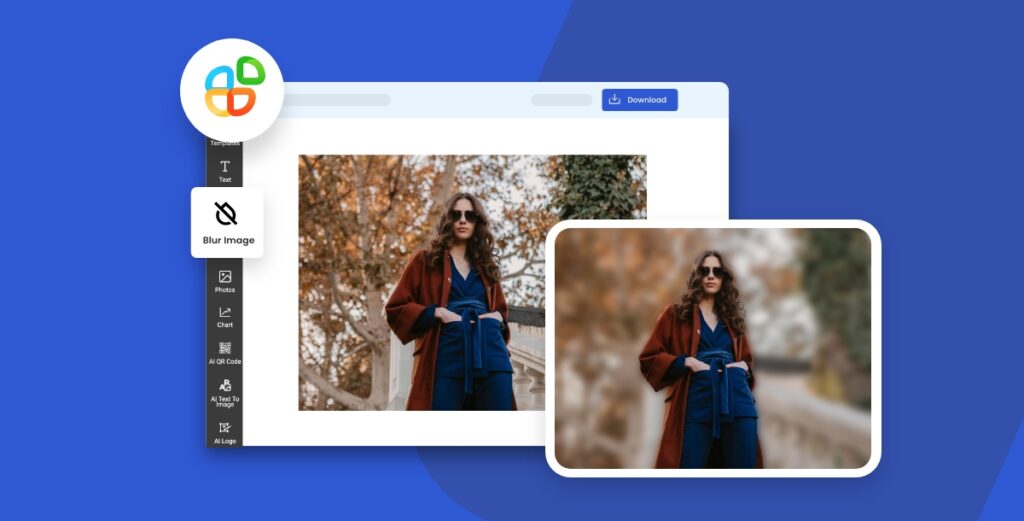
How to Blur Background In Appy Pie Design?
Using Appy Pie's Background Blur tool to blur the background of your images is a must. Follow these simple steps:
- Access the App: Open the Appy Pie Background Blur tool on your device. You can typically find it on the Appy Pie website or app platform.
- Upload Your Image: Look for an option to upload or import your image into the tool. This is usually a straightforward process where you select the photo you want to edit from your device
- Automatic Background Detection: Appy Pie's tool often comes with automatic background detection. Let the tool analyze your image to identify the foreground and background elements
- Adjust Blur Intensity: Explore the tool's settings to find options for adjusting the blur intensity. Most tools provide a slider or numerical input to control how much you want to blur the background. Experiment to achieve your desired effect.
- Preview Your Edit: Take advantage of the preview feature to see how the blur bakground enhances your image. This allows you to make any adjustments before finalizing the edit.
- Save or Download Your Image: Once satisfied with the result, look for an option to save or download your edited image. Appy Pie's tool usually allows you to choose the format and quality for saving.
- Share Your Blurred Image: If you want to showcase your edited photo on social media or share it with others, explore the tool's sharing options. Some tools provide direct links or integrations with social platforms for easy sharing.
Advantages of using Appy Pie's Blur Image Tool
Using Appy Pie’s AI-powered blur image tool comes with several advantages:
- Efficiency: AI blur tools are highly efficient and can process images quickly, saving you time compared to manual editing.
- Automatic Background Detection:Appy Pie AI Blur Image Editor comes with automatic background detection, accurately identifying the foreground and background elements in an image without manual input.
- Precision and Consistency:AI algorithms ensure precise and consistent blurring, avoiding errors or inconsistencies that may arise in manual processes.
- User-Friendly: Appy Pie’s Blur Image Editor is often designed with user-friendly interfaces, making them accessible to individuals with varying levels of expertise in image editing.
- Customization Options: Users typically have the option to customize the intensity and style of blur, allowing for a personalized touch to suit different preferences and creative needs.
- No Watermarks or Branding: Your images will be completely free of our branding and watermarks. Instead, we’ll leave you with your own custom creation, and your image will be only yours.
- Cloud-Based: It is cloud-based, so all your images will be safe, and you can access them anywhere and on any device worldwide.
- Absolutely Free: Appy Pie’s blur image editor is completely free to get started. Just sign up now, upload your image, and start editing. It’s time to make your audience focus precisely where you want.
- Download and Install Magic Studio:Background Blur:Start by downloading and installing the Magic Studio: Background Blur app on your device. You can find it in your app store or on the official website.
- Open the App and Select Your Photo:Launch the app and choose the photo you want to edit. Most apps have a user-friendly interface, making it easy to navigate through your device's gallery and select the image you wish to enhance.
- Identify the Background: Once your photo is loaded, use the app's tools to identify the background. Some apps may have an automatic background detection feature, while others might require you to manually mark the foreground and background areas.
- Adjust the Blur Intensity: Look for the blur intensity or depth-of-field adjustment settings. Here, you can control how much you want to blur the background. Experiment with the settings until you achieve the desired effect. Keep in mind that a subtle blur often works well for a natural look.
- Refine Edges (if necessary): Some apps offer edge refinement tools to ensure a seamless transition between the subject and the blurred background. Use these tools to fine-tune the edges, avoiding any unnatural or jagged lines.
- Preview and Save: Before finalizing your edit, take advantage of the preview feature to see how the blurred background enhances your photo. If you're satisfied, save the edited image to your device's gallery.
- Share Your Blurred Background Photo: Once saved, you can easily share your masterpiece on social media or with friends. Showcase the enhanced focus on your subject and the professional-looking blur background you've achieved using Magic Studio: Background Blur. You can also explore tool like AI photo enhancer to make the visuals more appealing and captivating for you.
- User-Friendly Interface: Magic Studio: Background Blur typically offers a user-friendly interface, making it accessible for both beginners and experienced users. The intuitive design ensures a smooth editing process without a steep learning curve.
- Automatic Background Detection:Many users appreciate the convenience of automatic background detection. This feature helps identify the foreground and background elements in your photo with minimal manual input, saving time and effort.
- Adjustable Blur Intensity: The app often provides a range of options to adjust the blur intensity. This flexibility allows users to customize the level of blur background according to their preferences, whether they're aiming for a subtle effect or a more pronounced separation between the subject and background.
- Edge Refinement Tools: To achieve a polished and professional look, Magic Studio may include tools for refining edges. These features help users ensure a seamless transition between the subject and the blurred background, avoiding any unnatural or jagged lines.
- Social Media Sharing: Once the editing process is complete, Magic Studio often allows for easy sharing of your enhanced photos on social media platforms. This feature is convenient for users who want to showcase their edited images quickly.
- Cost (Free or Paid): Depending on the app's model, Magic Studio may offer both free and premium versions. The availability of essential features in the free version provides users with a taste of the app's capabilities, while premium versions may unlock additional advanced tools or features. Users can choose the option that best suits their needs and budget.
- Open Your Image: Launch Photoshop and open the image you want to edit.
- Duplicate the Background Layer: In the Layers panel, right-click on the background layer and choose "Duplicate Layer." This ensures you have a copy to work on, preserving the original image.
- Create a Depth Map (Optional): For more precise control over the blur, you can create a depth map. This grayscale image will define the areas of focus. If not, Photoshop will analyze the image itself.
- Select the Lens Blur Filter: With the duplicated layer selected, go to the top menu, choose "Filter," then "Blur," and finally "Lens Blur."
- Adjust Settings: In the Lens Blur dialog box, you'll find various settings. Play with the "Radius" to control the blur intensity. If you have a depth map, select it under the "Source" option. Adjust other settings like "Blade Curvature" and "Rotation" as needed.
- Preview the Effect: Check the "Preview" box to see how the blur affects your image. This helps you fine-tune the settings for the desired result.
- Finalize and Save: Once satisfied with the result, click "OK" to apply the Lens Blur filter. Save your image with a new name to keep the original intact.
- Precision and Control: Photoshop's Lens Blur offers a high level of precision and control over background blurring. With advanced settings like Radius, Blade Curvature, and Rotation, users can fine-tune the effect to achieve the desired blur level, allowing for a customized and professional look.
- Depth Map Integration: For users seeking even greater control, the option to integrate a depth map provides a nuanced approach to defining areas of focus. This feature enhances the accuracy of the blur effect, especially in images with varying depths.
- Professional-Grade Results: As part of Adobe Photoshop, Lens Blur provides professional-grade results. The tool is designed to meet the standards of graphic designers, photographers, and visual artists, ensuring that the edited images maintain a high level of quality and sophistication.
- Seamless Integration with Other Photoshop Tools: Photoshop's Lens Blur seamlessly integrates with a wide array of other Photoshop tools and features. This enables users to combine blurring background with additional enhancements, adjustments, or creative effects, offering a comprehensive platform for image editing.
- Compatibility with Various Image Formats: Photoshop supports a wide range of image formats, ensuring that users can apply the Lens Blur effect to photos regardless of their source format. This versatility is crucial for professionals working with diverse projects and file types.
- Cost (Subscription-based): Adobe Photoshop is not free to use. It operates on a subscription-based model, where users pay a monthly or annual fee to access the software. Adobe often provides different subscription plans with varying levels of access to its creative tools, including Photoshop. While this means a cost is involved, many professionals find the investment worthwhile for the robust features and continuous updates provided by Adobe.
- Upload Your Image:
- Head over to PhotoRoom's website or open the app.
- Drag and drop your desired image onto the platform, or click the "Upload Image" button to browse your files.
Embrace the AI Magic: Once uploaded, PhotoRoom's AI will automatically analyze your image, recognizing your subject and distinguishing it from the background. This usually takes just a few seconds.
- Blur and Go: Adjust the blur background to your liking:
- Intensity: Use the slider to control the depth of the blur effect. From subtle softening to complete obscurity, it's your call.
- Style: Choose from various pre-defined blur styles like "Dreamy," "Bokeh," or "Lens Blur" for different creative looks.
- Fine-tuning (Optional): For advanced users, PhotoRoom offers tools like "Brush" and "Eraser" to refine the blur around specific areas.
- Select Your Image: Choose the photo you want to edit and open it in your preferred editing software.
- Define the Focus Area: Identify the main subject or object in your image that you want to keep sharp.
- Apply Inpainting Blur: Use the Inpainting tool to selectively blur the background, seamlessly removing unwanted elements.
- Adjust Settings for Realism: Fine-tune the blur intensity and transition to achieve a natural and realistic look.
- Duplicate the Layer: Create a duplicate layer of your edited image to preserve the original.
- Expand the Canvas: Increase the canvas size to give yourself room for creative outpainting.
- Add Elements Beyond the Frame: Use brushes or tools to extend the background, adding depth and enhancing visual interest.
- Blend for Seamless Integration: Blend the extended elements with the existing background for a cohesive and professional finish.
- Review and Refine: Zoom in to inspect details, making any necessary refinements for a polished result.
- Save Your Masterpiece: Save your edited image in the desired format, preserving the high quality of your work.
- Making Your Subject Stand Out: Using a blur background is like putting a spotlight on your main subject. By reducing the details behind your subject, whether it's a person, a product, or an object, you ensure that viewers' eyes are immediately drawn to what matters most in the picture. It adds a touch of visual emphasis, making your subject the star of the show.
- Creating a Professional Look: Professional photographers often use blur backgrounds to elevate their shots. In portrait photography, for instance, a blurred background adds a touch of sophistication and separates the subject from the surroundings. The same applies to product shots—blurring the background imparts a polished, high-end quality, making your visuals look like they belong in a magazine or an advertisement.
- Hiding Distractions: Life can be messy, and sometimes there's no time to tidy up the background before taking a photo. Whether it's a cluttered room or unwanted objects, a quick blur can work wonders.It not only conceals distractions but also turns potential photo bombs into subtle, unobtrusive elements. This way, you get a clean, focused image without the need for meticulous setup. Blurring becomes your shortcut to a more aesthetically pleasing and distraction-free photograph.
- How to Link Facebook Lead Ads with a Mailchimp Email List
- Top 5 Zoho Creator Integrations For Your Business
- 33 Customer Success Manager Interview Questions
- How Plumber Chatbots are Transforming Customer Service in the Plumbing Industry
- Mastering Customer Churn Rate in Today’s Market
- Odd-One-Out: Anomaly Detection by Comparing with Neighbors
- 21+ Exceptional Modern Logo Designs: Ideas and Tips
- How To Monetize Your Website In 15 Proven Steps
- Top 10 Money Making Apps for Android and iOS
- How to Drop a Pin on Google Maps on Mobile and Desktop?
It's important to note that the specific advantages may vary depending on the particular AI blur tool and its features. Always check the documentation or information provided by the tool's developer for details on its capabilities and benefits.
2. Magic Studio: Background Blur
Magic Studio Background Blur tool uses AI to detect the subject from an image and separate the background from the image. It then applies a blur to the separated background behind your subject. You can control the degree of a blur as you see fit and see the preview in real-time. It's your one-click solution to transforming any image into a professional masterpiece. No more masking tools or hours spent manually blurring pixels. Magic Studio's intelligent algorithms instantly recognize your subject and seamlessly blur the background, creating a natural and realistic effect.
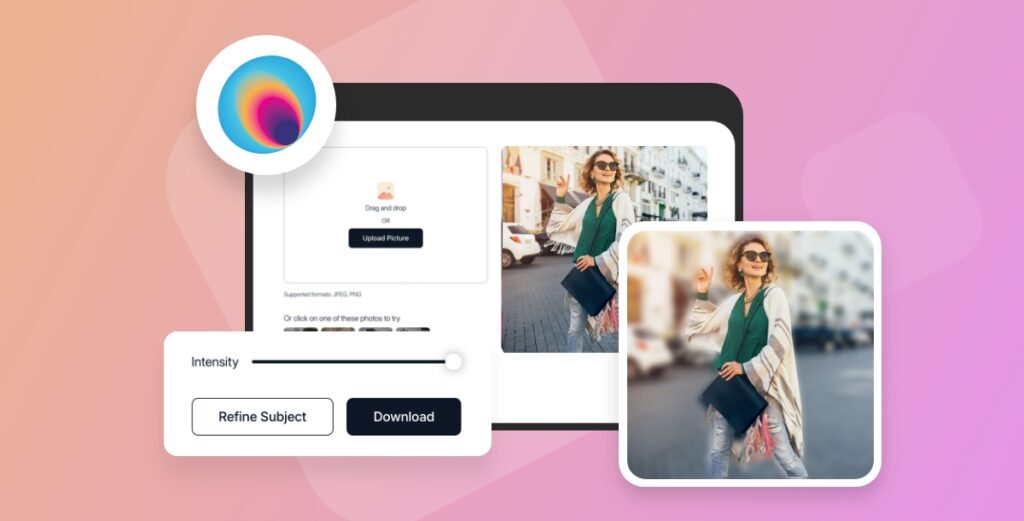
How To Blur the Background Using Magic Studio: Background Blur?
To blur the background using Magic Studio: Background Blur, follow these simple steps:
Advantages of Using Magic Studio: Background Blur
3. Photoshop: Lens Blur
For design enthusiasts, Photoshop's latest AI-powered Lens Blur filter is a total game-changer. It's like a super tool for making pictures look amazing without being a pro. This cool feature uses smart technology to effortlessly add a professional touch to your images, making them stand out with awesome visual effects. Whether you want to make things look super real or add some depth to your creations, this tool does it all. It's like having a secret weapon in your design toolkit! Let's dive into the magic world where different color backgrounds meet the power of AI in Photoshop's Lens Blur. Whether you're working with a vibrant purple background or experimenting with other hues, the Lens Blur tool seamlessly enhances your design, ensuring a genuine and stunning visual outcome.
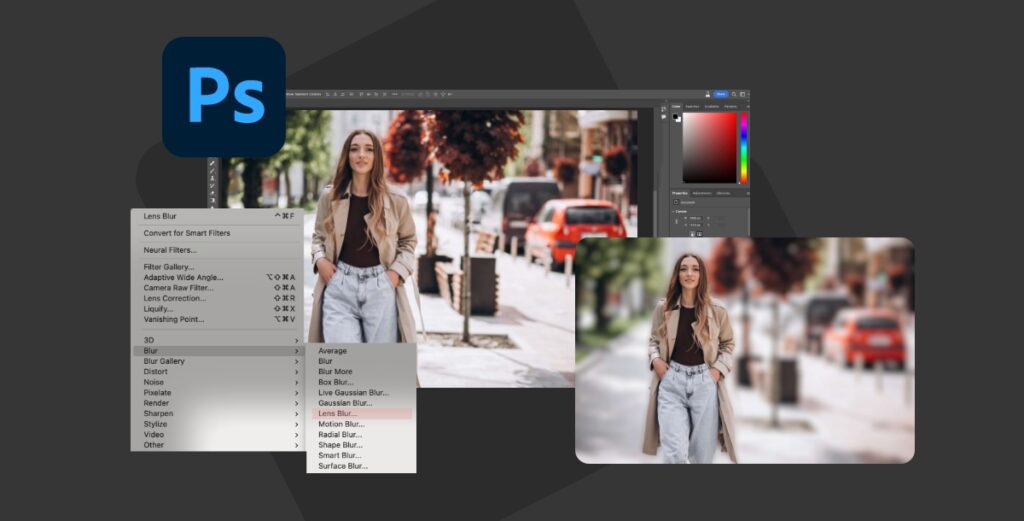
How to Blur Background in Photoshop?
Blurring the background using Photoshop's Lens Blur is a creative way to enhance your photos. Here's a simple guide to help you achieve this effect:
Remember to experiment with the settings to achieve the desired level of blur background. This simple process lets you transform a regular photo into one with a professional-looking, beautifully blurred background using Photoshop's Lens Blur.
Advantages of Using Photoshop: Lens Blur
4. PhotoRoom Blur Background Tool
PhotoRoom's AI Blur Background Tool offers a convenient and efficient way to automatically remove or blur unwanted backgrounds from your photos. Powered by advanced artificial intelligence, the tool accurately identifies and separates your subject from the background, allowing you to create professional-looking edits with minimal effort. Overall, PhotoRoom's AI Blur Background Tool is a valuable addition to any image editing toolbox, offering a quick and easy way to create impactful visuals with professional-looking results. Whether you're a beginner or a seasoned photographer, this tool can help you elevate your photos and take them to the next level.
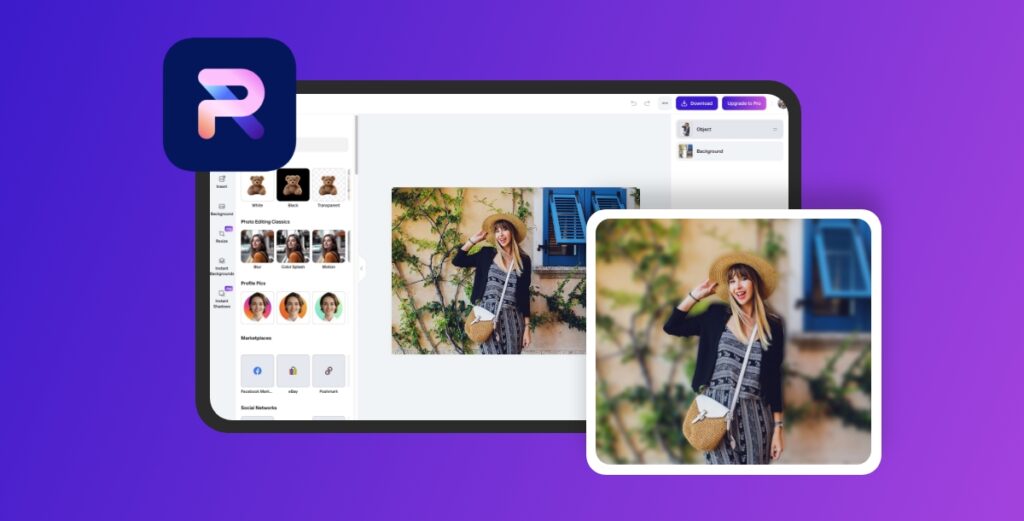
How To Blur Background Using PhotoRoom Blur Background Tool?
Blur Your Background Like a Pro in Simple Steps with PhotoRoom's AI:
Once satisfied, click "Apply" to see your masterpiece! The finished image will have a beautifully blurred background, letting your subject truly shine. Experiment with different blur intensities and styles to find the perfect fit for your image. PhotoRoom allows you to preview the changes in real-time before applying them, so don't hesitate to play around!
With these simple steps, you can easily blur your backgrounds and take your photos to the next level using PhotoRoom's AI Blur Background tool.
Blurring Backgrounds with Inpainting and Outpainting Techniques
Are you ready to take your photo editing skills to the next level? Learn the art of blurring backgrounds with precision using Inpainting and Outpainting techniques.
Inpainting Technique:Why Blur the Background?
In the digital realm, there can be no one who doesn’t want a perfect picture to upscale their social media game for an engaging presence. Whether it is creating a perfect WhatsApp dp or meaningful Instagram stories effective use of tools like AI photo editor is made by many.Therefore there's no conceivable reason why someone wouldn't want a blur background to eliminate the disrupting backdrop of their photo.
Conclusion
We have discussed many reasons why we should use a blur background for an Image. How we can achieve it by harnessing the power of AI is simplified in this blog post. Using AI to blur backgrounds in photos, particularly with tools provided by Appy Pie Design is like having a smart and easy-to-use assistant for your pictures. It makes things simple, from uploading your image to adjusting the blur. The magic happens with the AI automatically figuring out what to focus on and blurring the background just right. You get to play with settings to make it look exactly how you want – more blurry or less, with smooth edges and cool effects. It's not just about making things look good; it's about making photo editing easy and fun. With AI, anyone can make their pictures stand out without being a pro. So, as we wave goodbye to complicated editing, we welcome a new era where AI turns every photo into a chance to create something awesome effortlessly.