

In the modern work landscape, characterized by remote and global teams, the demand for tools that enable effective and efficient communication is at an all-time high. Slack, serving as a central hub for team collaboration, is pivotal in meeting this demand. However, as teams expand and operate across various time zones, the task of manually updating Slack statuses becomes increasingly impractical. The implementation of automatic status updates, a feature enhanced by various Slack integrations, not only saves precious time but also promotes a culture of transparency and respect toward colleagues' time and availability. Such integrations streamline communication processes, ensuring that everyone is on the same page regardless of their geographical location, ultimately fostering a more cohesive and productive work environment.
What is Slack's Status?
A Slack status is an integral feature of Slack, the widely used team collaboration platform, enabling users to convey their current availability or activity through a succinct message or emoji displayed alongside their name. This functionality becomes especially vital in the context of remote work or for teams dispersed across multiple time zones, facilitating seamless communication. By setting a status, individuals can efficiently inform their colleagues if they are engaged in a meeting, taking a lunch break, on vacation, dedicating time to concentrated work, or temporarily away from their workstation.
How to Set Your Slack Status?
Setting your Slack status helps communicate your availability and activities to your team without the need for direct messages or emails. Here's a simple guide on how to set your Slack status, whether you're using the desktop or mobile app.
On Desktop:
Step 1: Open Slack on your desktop.
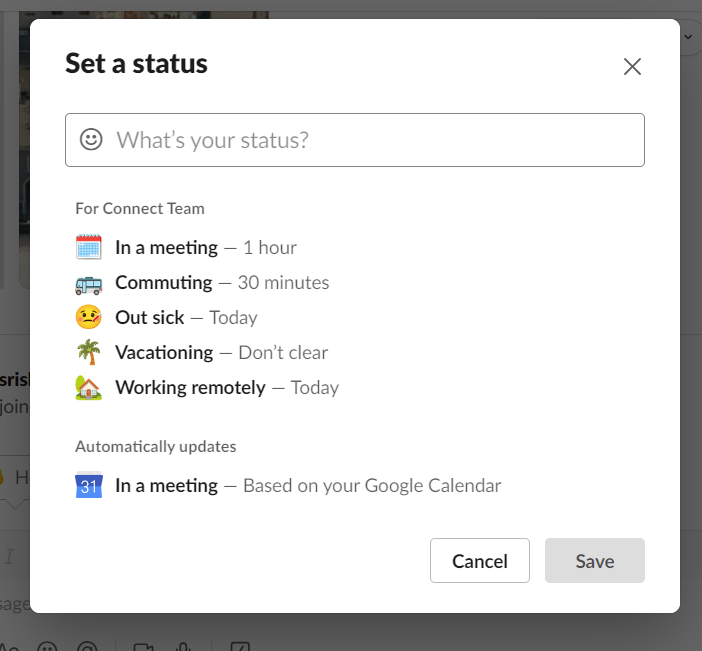
Step 2: Select "Set a status" from the dropdown menu. Slack might offer some default status options like "In a meeting," "Commuting," etc.
Step 3: Choose a suggested status or create a custom status. To customize:
Type your status message in the text box along with an emoji.
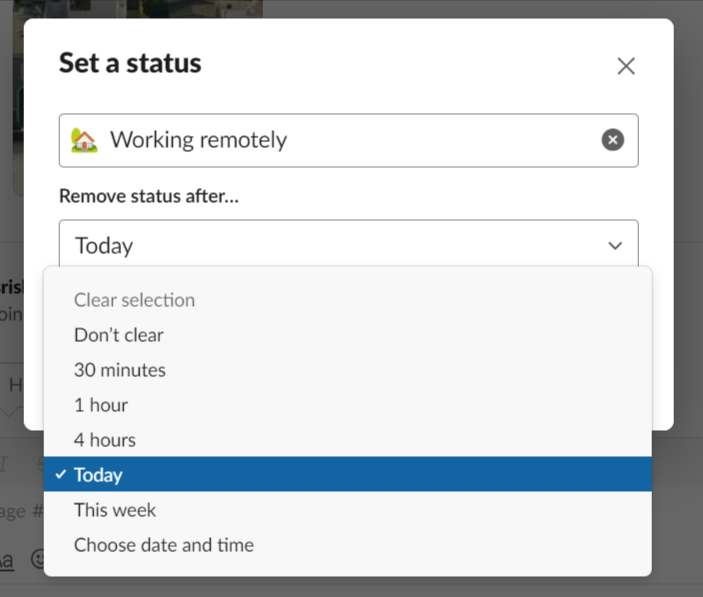
Step 4: Set a duration for your status. You can choose from the predefined duration (e.g., Today, This week) or set a custom time frame. If you don't choose a duration, some organizations' Slack settings might automatically clear it after a certain period.
Step 5: Click Save.
On Mobile:
Step 1: Open the Slack app on your mobile device.
Step 2: Tap on the "You" tab at the bottom right corner (the icon might vary based on Slack updates).
Step 3: Tap on "Set a status" or your current status if you have one set already.
Step 4: Select from the suggested statuses or tap on "Set a custom status" to create your own and enter your message.
Step 5: Select a duration for how long you want your status to be visible. If no duration is set, it may default to a standard duration based on your organization's Slack settings.
Step 6: Save your status by tapping "Save" or "Set Status" (the exact wording may vary).
How to Automatically Set Slack Status?
Automating your Slack status using Appy Pie Connect allows you to seamlessly integrate your workflow with Slack and various other apps without writing a single line of code. Here’s how to set up automatic Slack status updates with Appy Pie Connect, a leading workflow automation tool.
Step 1: Sign Up or Log In to Appy Pie Connect
Create an Account: If you’re new to Appy Pie Connect, sign up for an account at Appy Pie Connect. If you already have an account, simply log in.
Step 2: Create a New Connect (Workflow)
Start a New Connect: Once logged in, click on the “Create Connect” button to start creating a new workflow. Appy Pie Connect refers to automated workflows as "Connects."
Step 3: Choose a Trigger
Select Your Trigger App: A trigger is an event in one app that starts the automation. For automating your Slack status, you might choose a calendar app like Google Calendar or a task management app like Trello as the trigger. For instance, when a calendar event starts, it triggers the workflow.
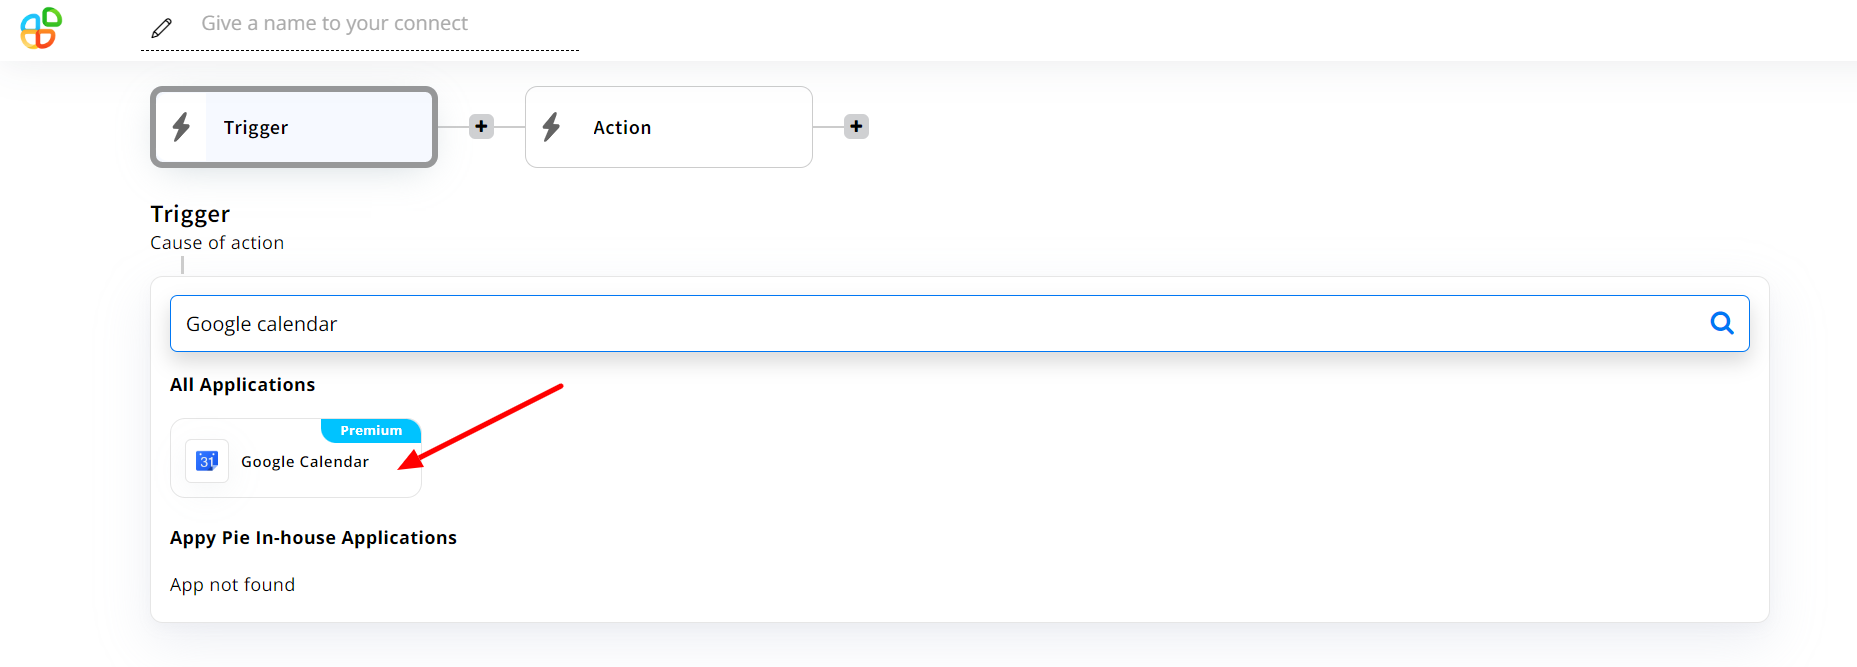
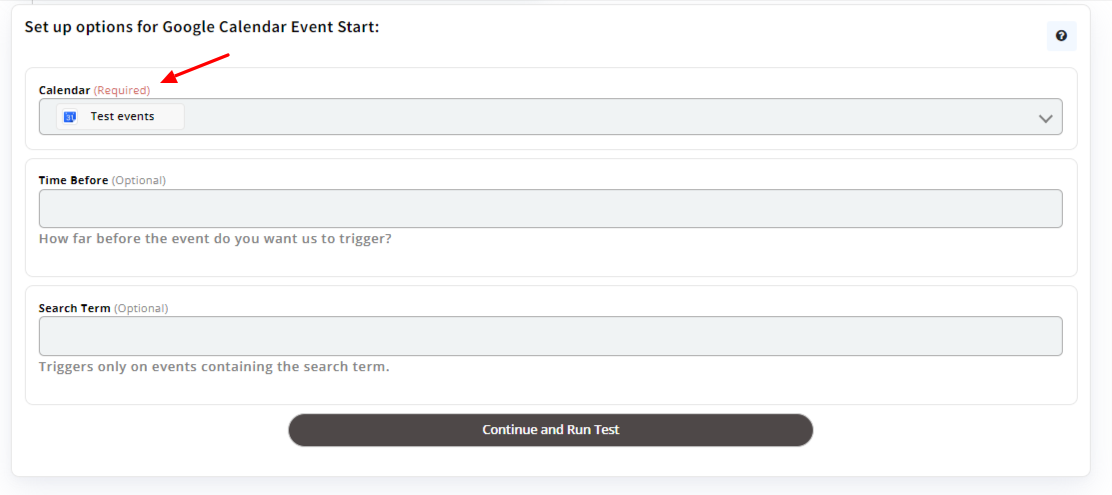
Set Up Trigger Details: Follow the prompts to specify the details of your trigger, such as “Event Start” in Google Calendar.
Step 4: Choose an Action
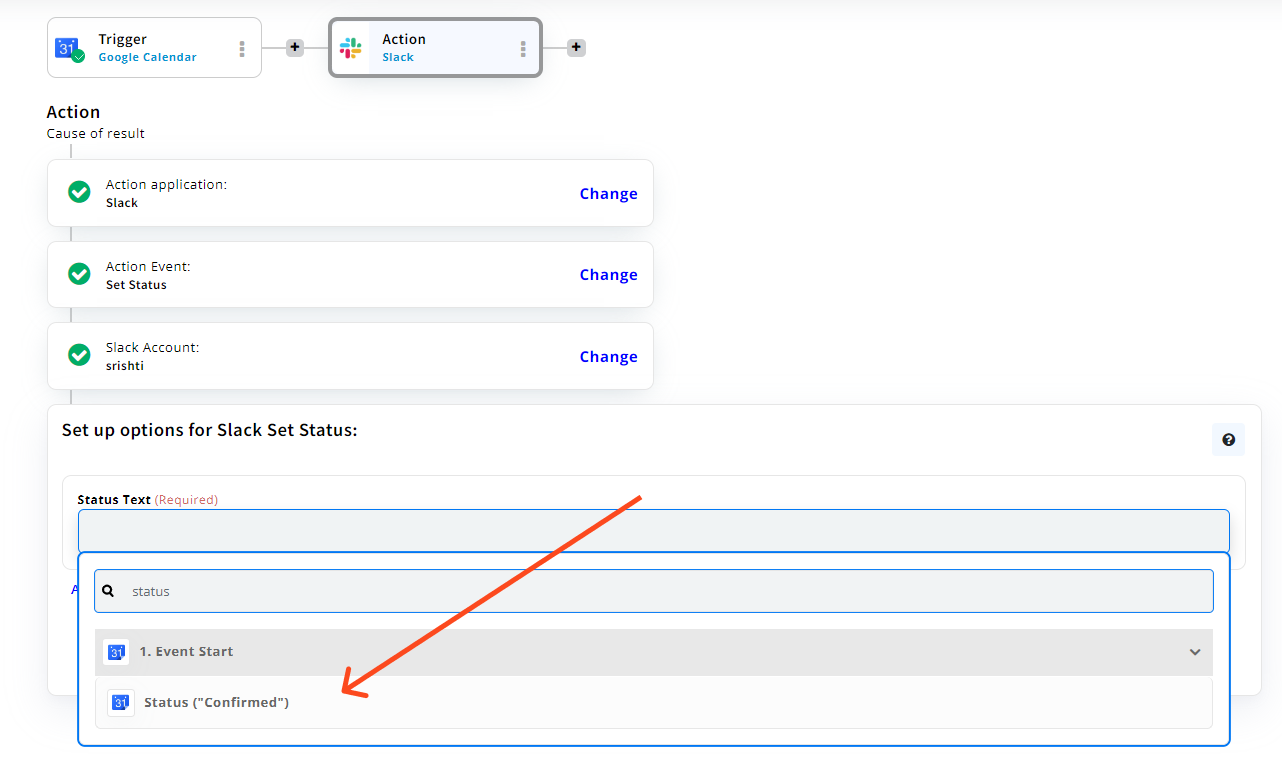
Select Slack as Your Action App: After setting up the trigger, the next step is to define what happens in the second app—Slack, in this case. Search for and select Slack.
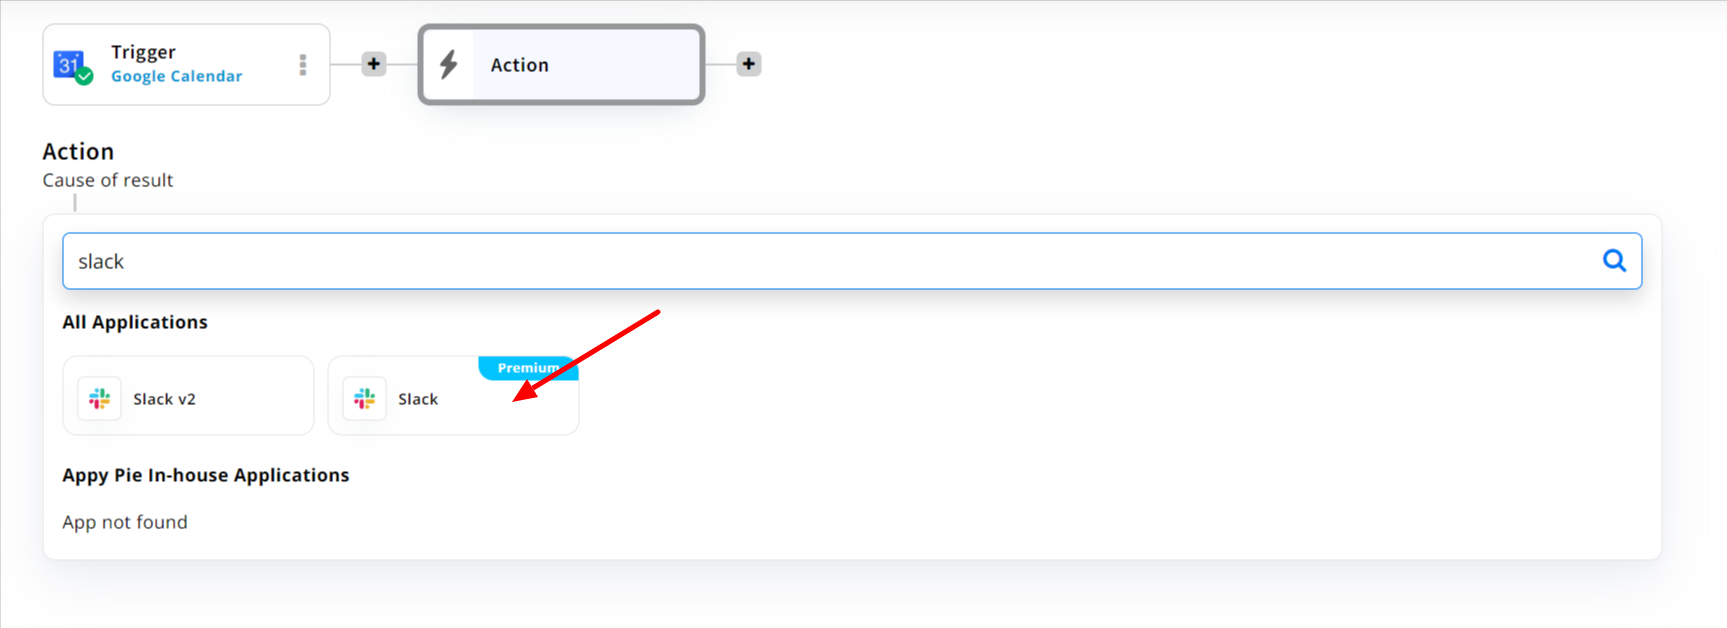
Choose Action Event in Slack: Select the action to be performed in Slack. For automating status updates, you’d choose “Update Status.”
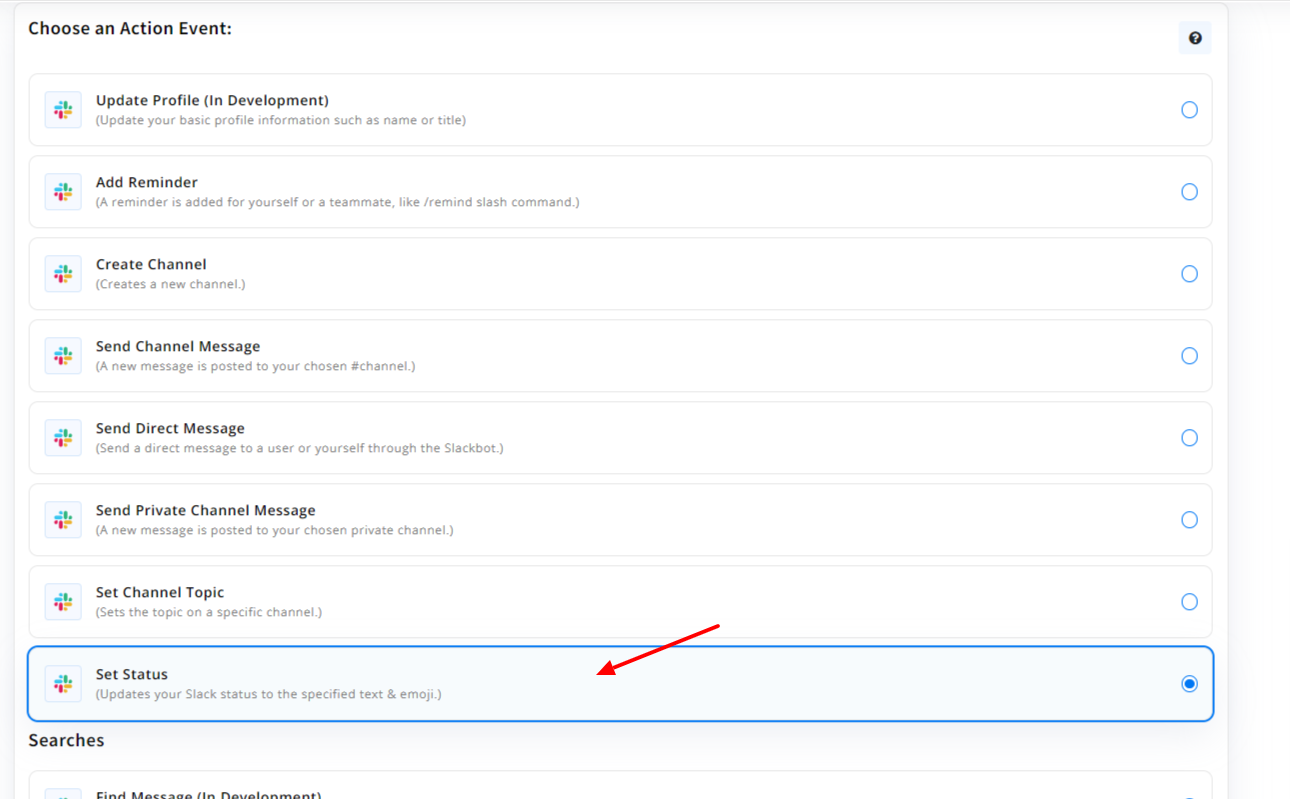
Customize Your Slack Status: Configure the details of your Slack status update. You can specify the status text, choose an emoji, and set the duration for which the status should remain active.
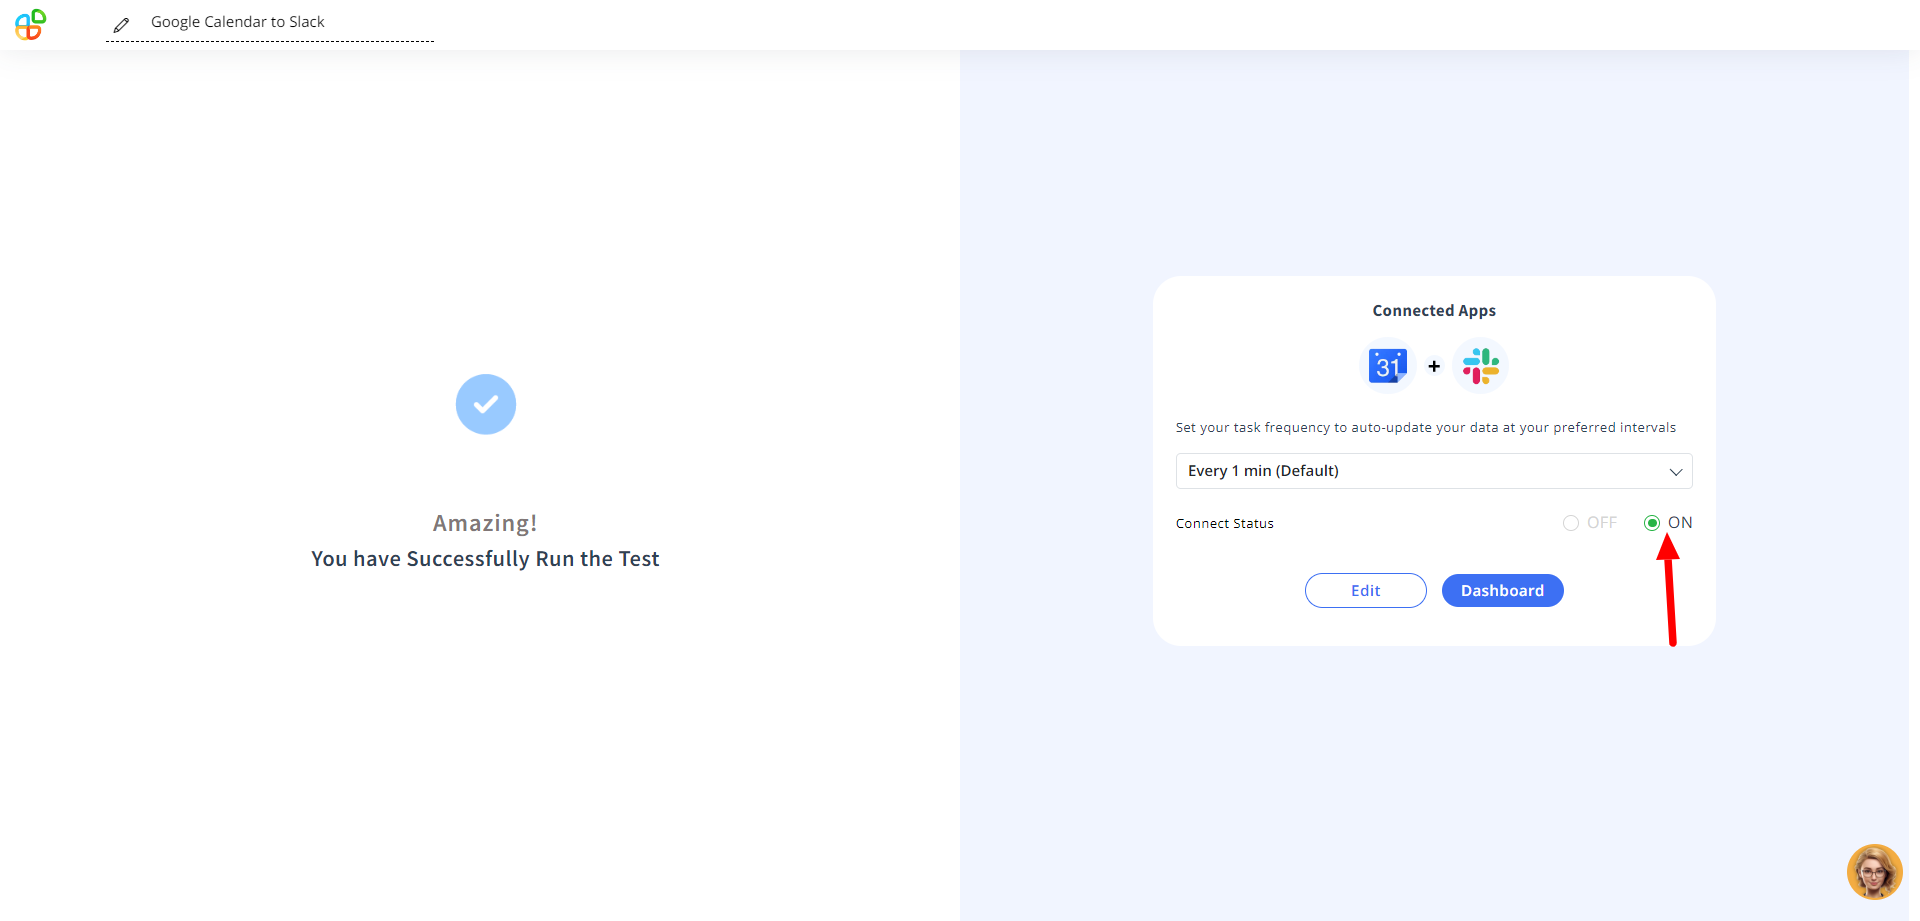
Step 5: Test and Activate Your Connect
Test the Connect: Appy Pie Connect will prompt you to test the workflow to ensure it works as expected. This step is crucial to verify that the trigger and action are properly configured.
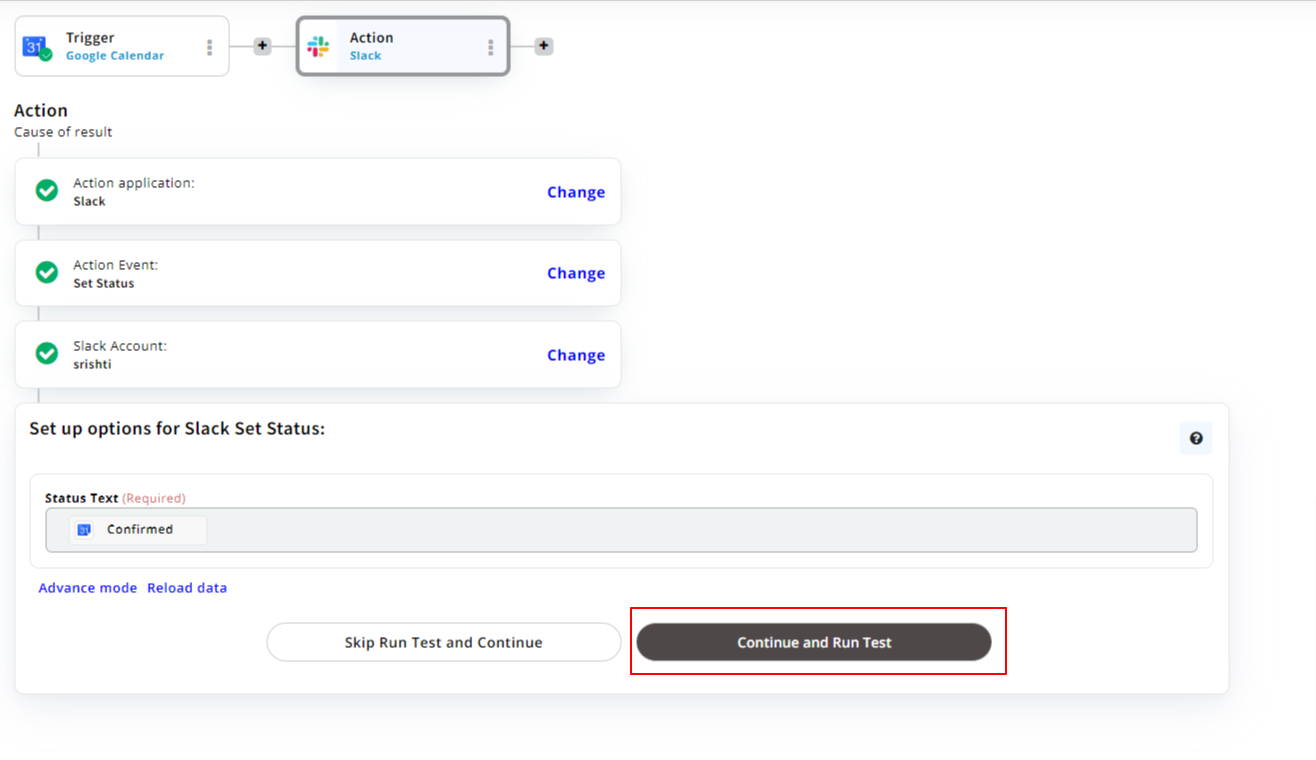
Activate Your Connect: If the test is successful, you can then activate your Connect. Your Slack status will now automatically update based on the trigger you’ve set.
Examples of Automated Slack Status Updates with Appy Pie Connect
Slack app integrations with Appy Pie Connect extend beyond simple status updates. They encompass a broad range of applications and services, enhancing Slack's functionality and its role as a central hub for team collaboration. Here are a few examples:
- Slack Integration with Google Calendar for Meeting Updates
- Slack Integration with Outlook for Schedule Transparency
- Slack + Gmail Integration for Immediate Responses
- Automate Slack Status Based on GitHub Activity
- Slack Integration with ServiceNow for Incident Management
- Slack Integration with Google Drive for Collaboration Alerts

With Slack integration with Google Calendar, your Slack status can automatically reflect your schedule. If you're in a scheduled event, your status can show as "Busy" or "In a meeting," and it clears once the event is over, thanks to Appy Pie Connect's automation capabilities.

Similarly, Slack integrations with Outlook allow your Slack status to update based on your Outlook calendar events. This ensures that if you're scheduled for a meeting according to Outlook, your Slack status will communicate this to your team.

The Slack Gmail integration is another brilliant feature, where incoming emails can trigger status updates or send notifications to a Slack channel. This is particularly useful for support teams who need to stay on top of urgent customer emails.
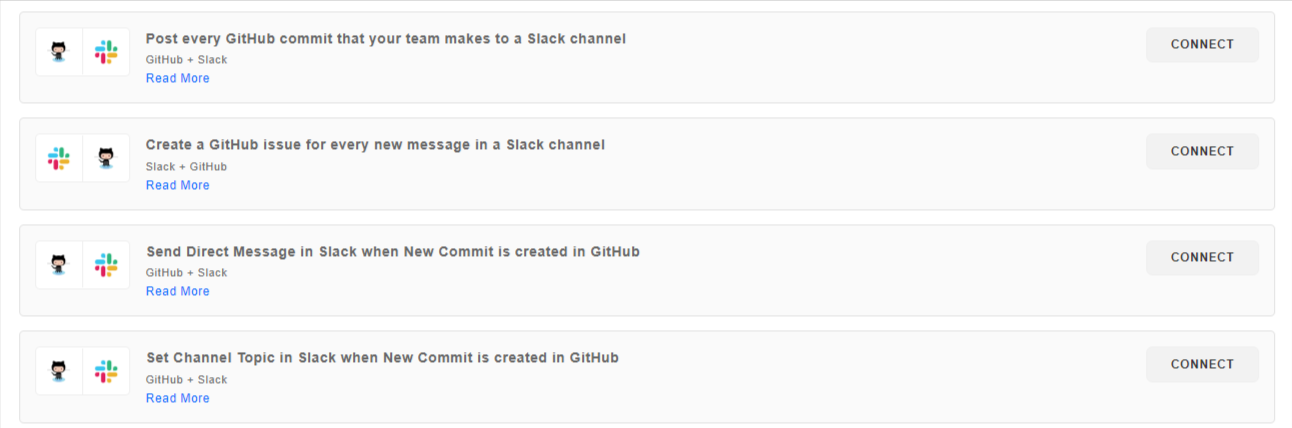
For development teams, the Slack integration GitHub feature is invaluable. When linked via Appy Pie Connect, any commit, pull request, or issue update on GitHub can automatically update your Slack status or send notifications to a designated Slack channel, keeping the entire team in sync with the project's progress.
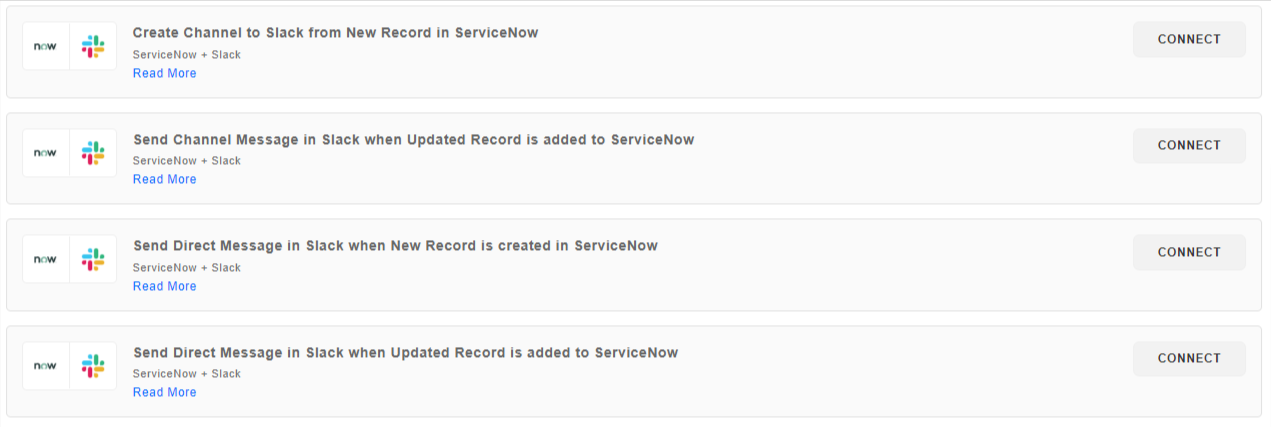
For teams using ServiceNow for IT service management, Slack integration with ServiceNow can automate alerts and status updates based on tickets or incidents, facilitating faster response times and better team coordination.
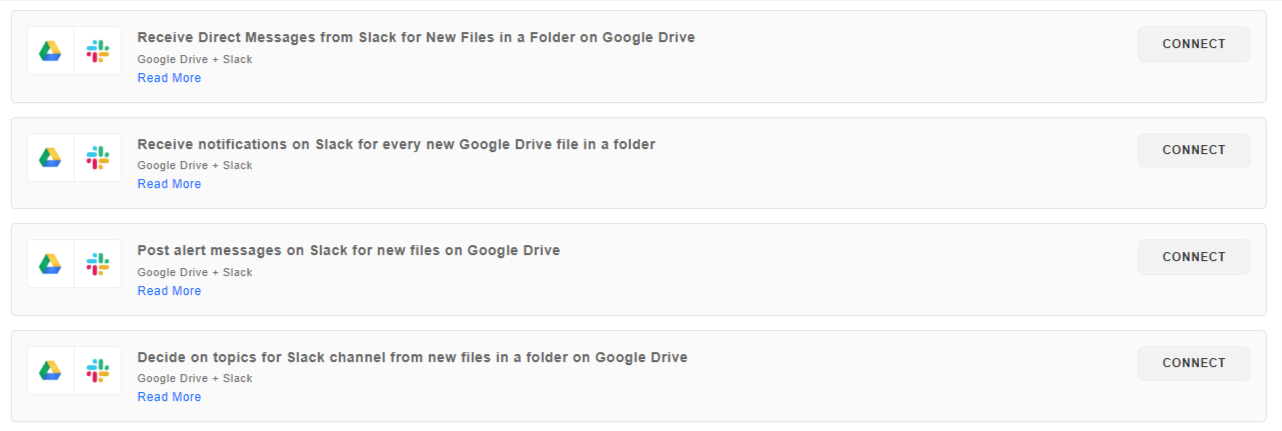
The Slack integration Google Drive feature ensures that updates on shared documents, spreadsheets, or presentations are automatically communicated through Slack. Whether a document is updated, commented on, or shared, the team can stay informed through automated notifications or status updates.
How to Create Autoreplies in Slack?
Creating auto-replies in Slack, while not a direct feature, can be achieved through the creative use of its functionalities and integrations. Here’s how to set up auto-replies in five precise steps:
Step 1: Access Workflow Builder
Navigate to your Slack workspace and click on your workspace name at the top left corner.
Step 2: Create a New Workflow
Give your workflow a descriptive name that indicates its purpose, such as "Autoreply for Direct Messages".
Step 3: Set Up Your Autoreply
After setting the trigger, add an action by selecting "Send a message".
Step 4: Save and Enable the Workflow
Once your message is set up, review the workflow to ensure it meets your needs.
Step 5: Test Your Autoreply
Test the workflow by triggering the autoreply to ensure it functions as expected.
Conclusion
The dynamic nature of modern workspaces, underscored by the prevalence of remote and global teams, necessitates tools that streamline communication and enhance productivity. Slack stands out as a central hub for collaboration, and with the integration of automated status updates and auto-replies via platforms like Appy Pie Connect, teams can achieve a new level of efficiency. Whether it's syncing with Google Calendar for meeting updates, managing emails through Gmail integration, or coordinating project updates via GitHub, these integrations ensure that your Slack status accurately reflects your availability, fostering a transparent and respectful work environment. By automating routine tasks, professionals can focus on more strategic activities, driving forward productivity and ensuring seamless collaboration across any distance.
Related Articles
- Mastering Twitter Advanced Search: A Comprehensive Guide
- Building a Rewarding Career: The Path to Becoming a Customer Success Manager
- Salesforce AWS S3 Integration | How to integrate Salesforce with AWS S3?
- 5 Restaurant Branding Tips to Create a Unique Brand Identity
8 Steps to Write the Perfect Business Plan*[Free Sample Business Plan included]
- Top 9 Best AI Resume Builder Tools in 2023
- Webex vs. Zoom: Which is Best to Use in 2024?
- Exploring The World Of Burnt Orange: From Origins And Meanings To Fashion, Art, And Future Trends
- How to Screw Up an App Project
- How to Design the Perfect App Store Icon?
Most Popular Posts
- WooCommerce Integrations: Everything You Need to Know
- Brand Building In a Competitive Market: Standing Out from the Crowd
- 7 Ways Artificial Intelligence Can Improve Help Desk Management
- 8 Steps for Setting Smart Sales Goals for a Stronger Business Plan
- What Does the Future Hold for AI in App Development? A Forecast and Analysis